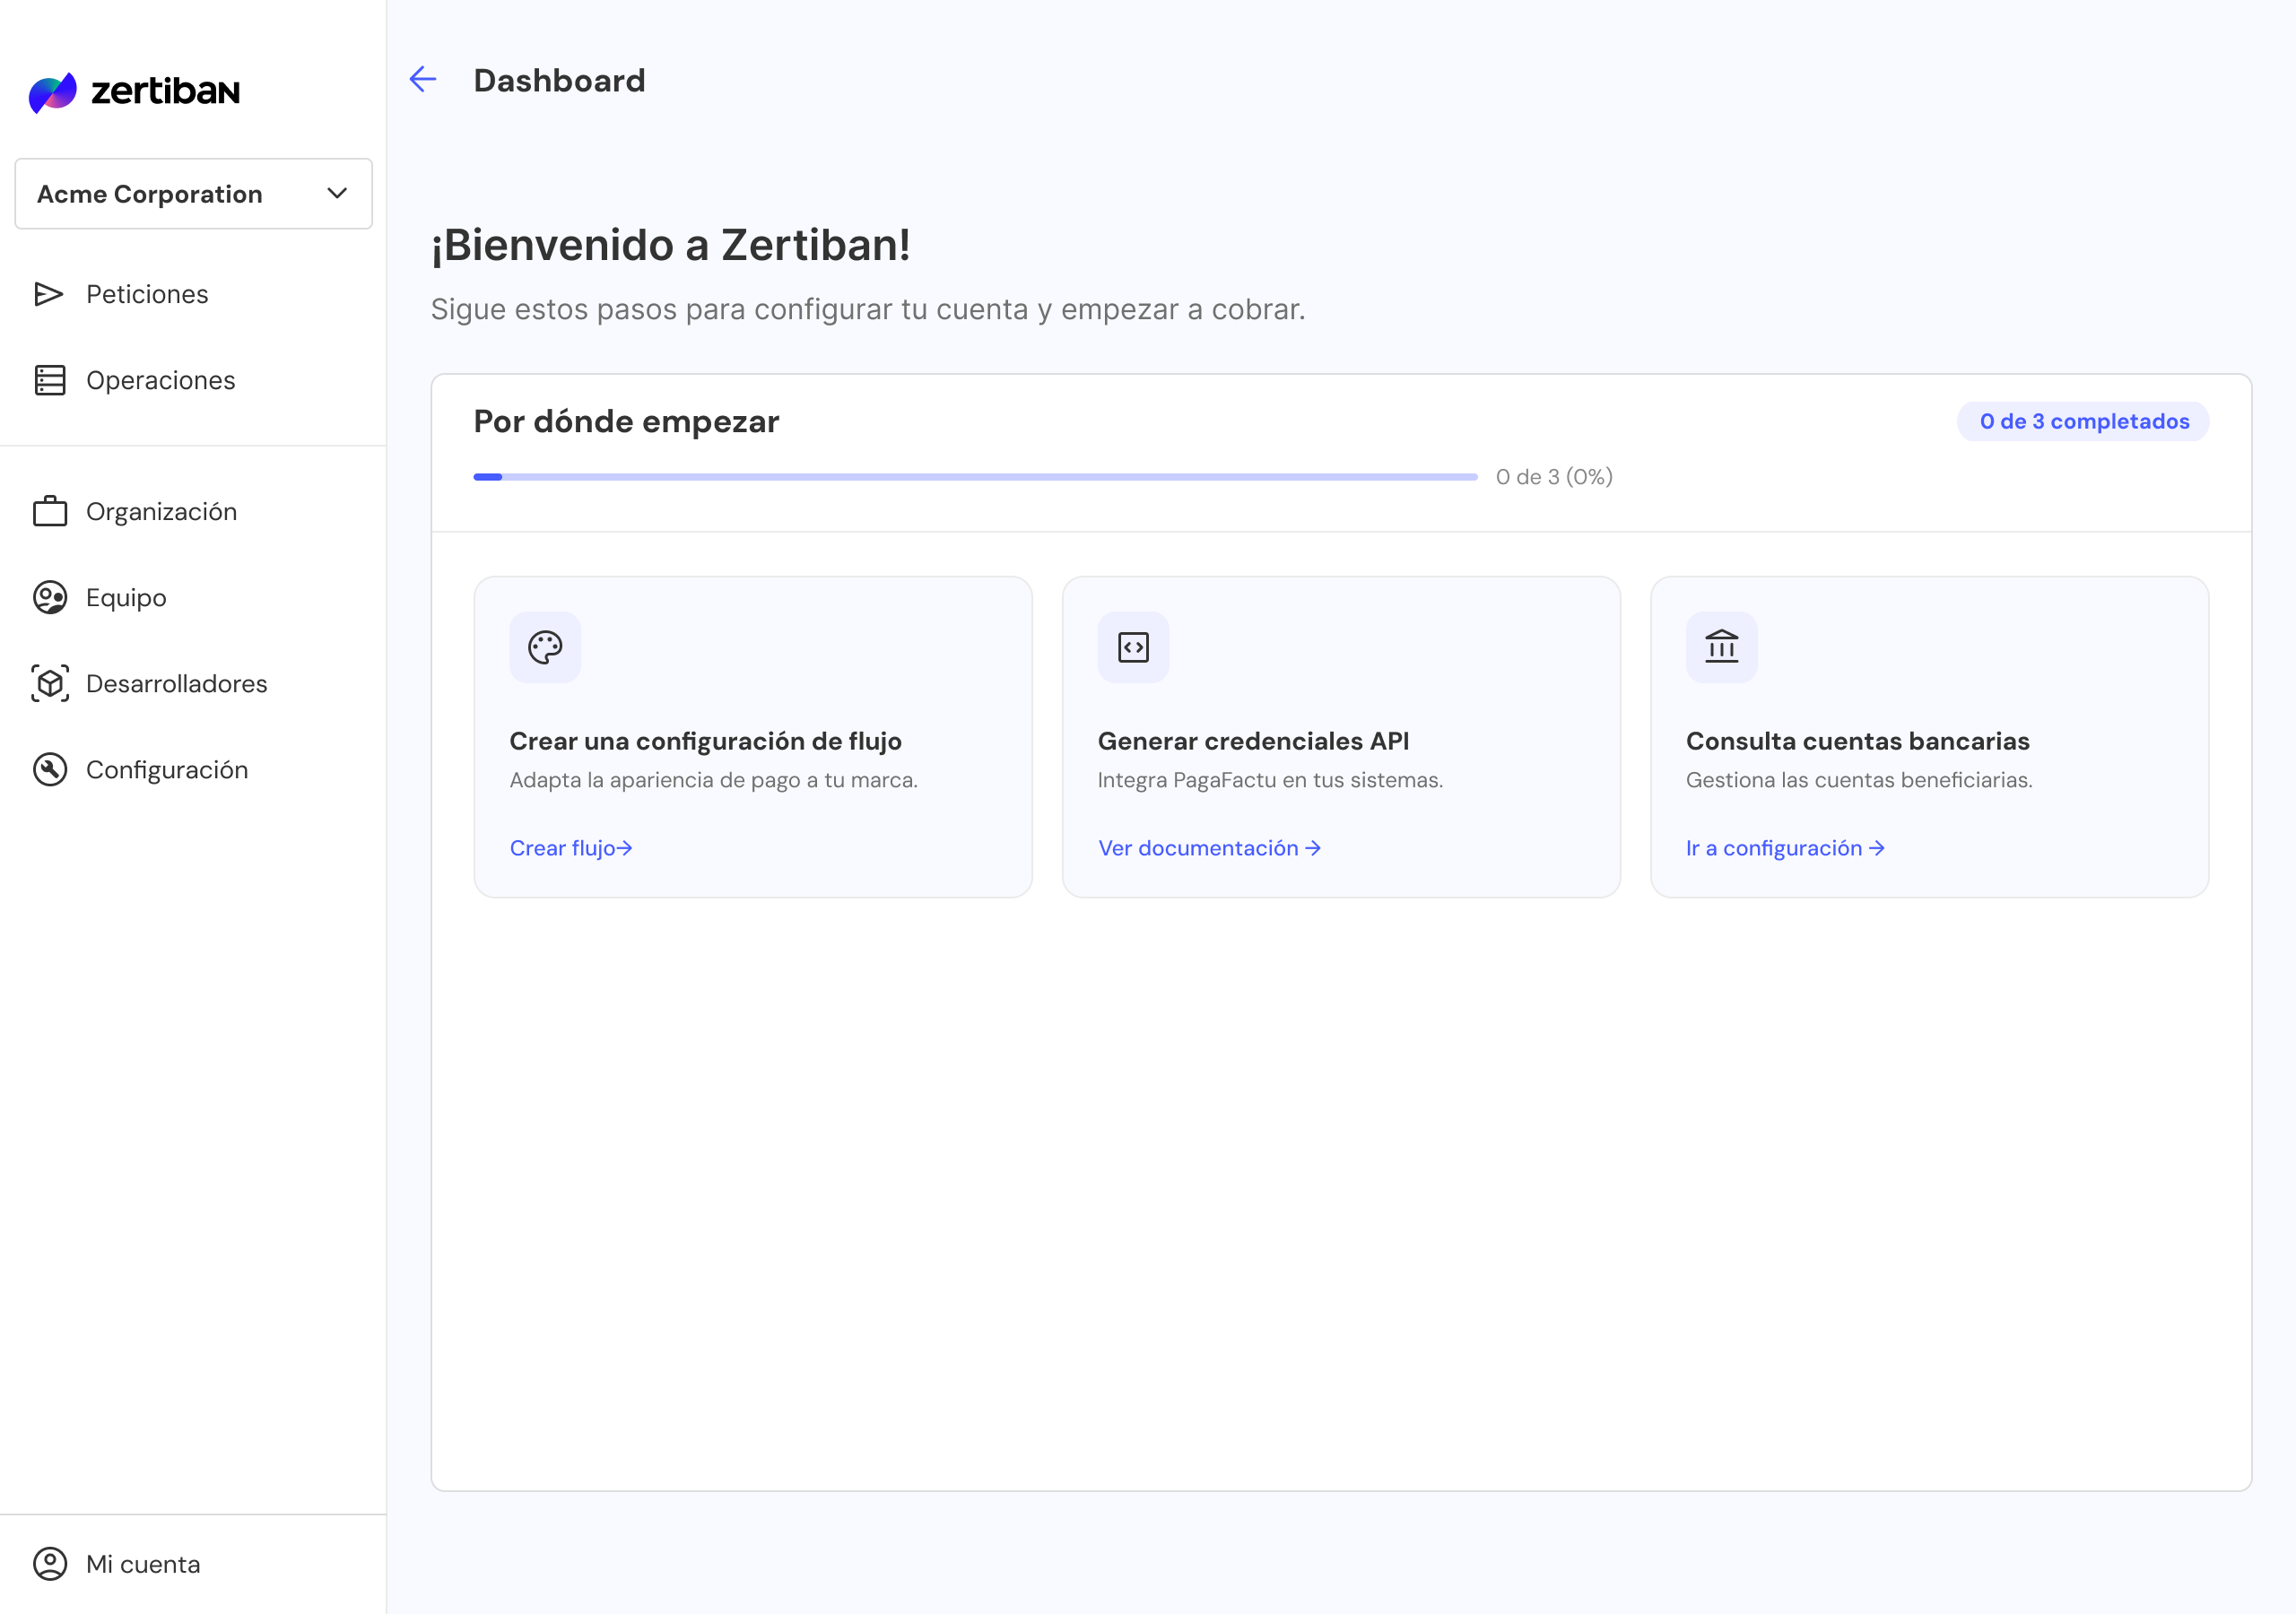
Dashboard
Your control panel. From here you manage credentials, configurations, operations, users and beneficiary accounts. This page walks through each area step by step.
What you get at the end
The 6 values you'll need as environment variables to integrate PagaFactu or ZertiPay from your backend. You'll find them summarised at the bottom of this page.
Generate API credentials
From Developers you generate, rotate and revoke the clientId / clientSecret pairs that authenticate each OAuth2 call.
Go to Developers → New credential
The system automatically generates the clientId / clientSecret pair.
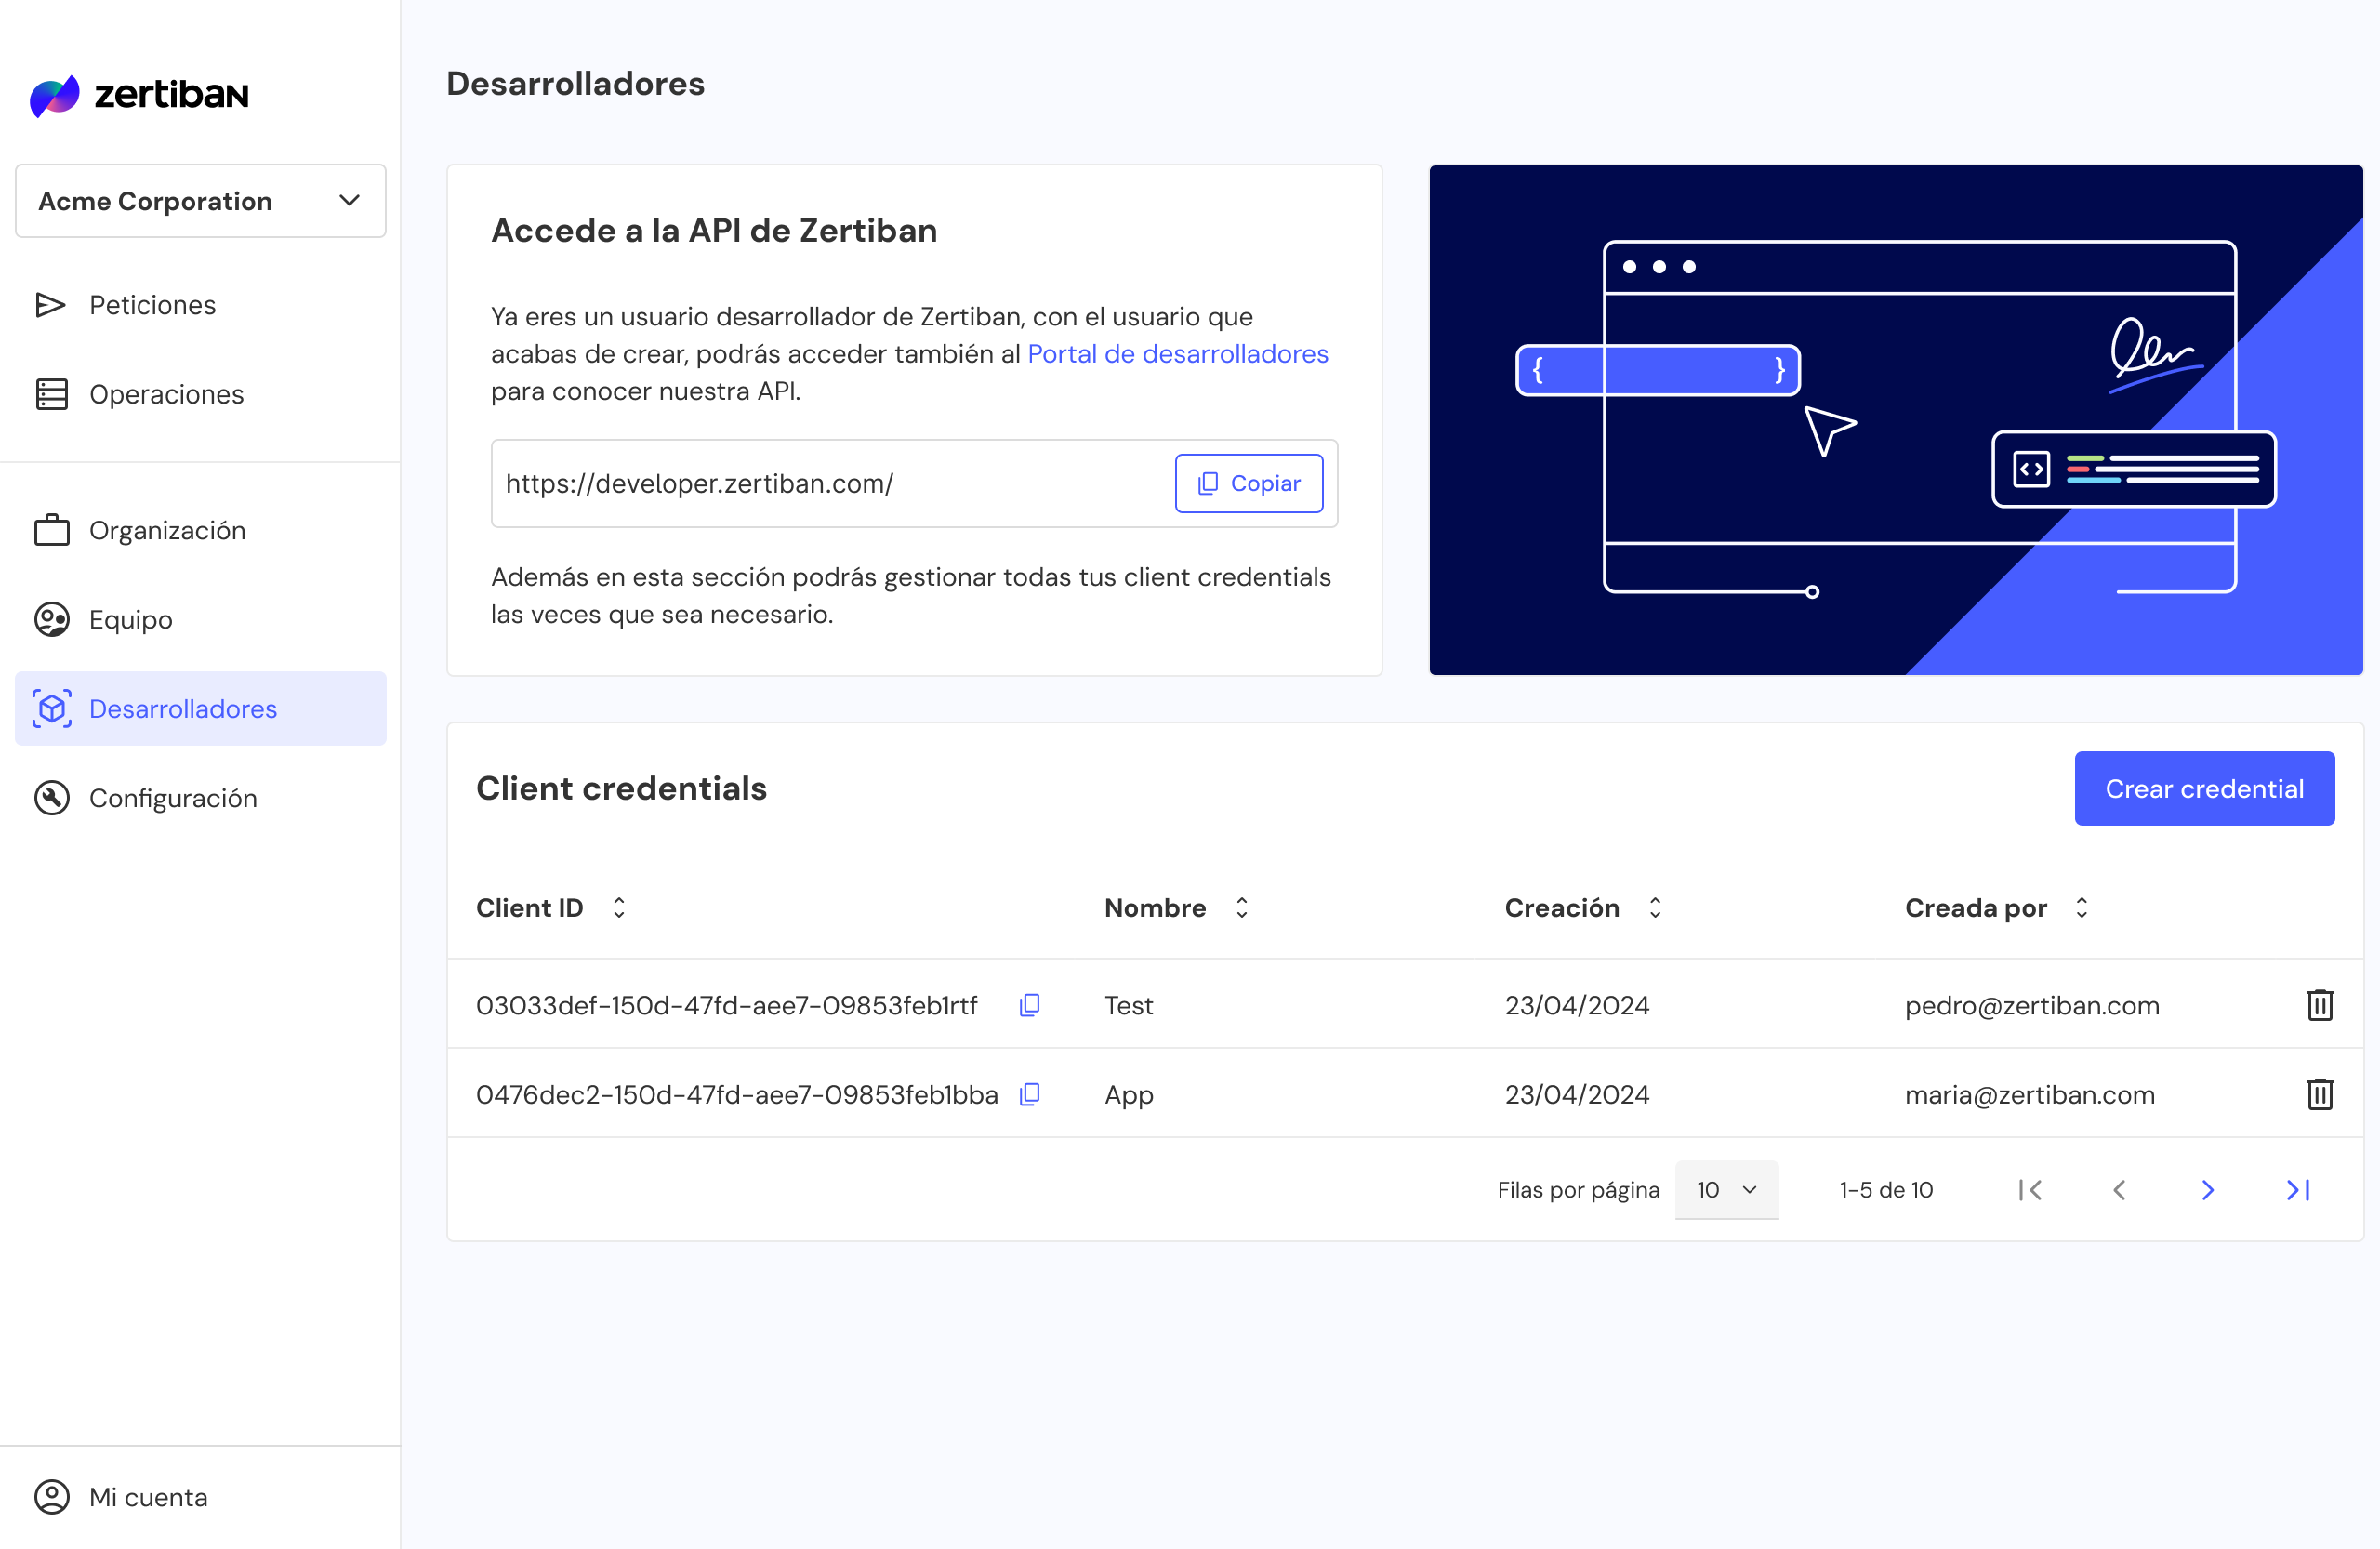
Copy the clientSecret immediately
The secret is shown only once. Save it in your secrets manager before closing the modal: there is no way to retrieve it afterwards.
Don't expose the secret
Do not include the clientSecret in client-side code (frontend, mobile apps). Always keep it on your backend.
Rotate before 180 days
Credentials expire every 180 days. You can have multiple active ones: create the new one, deploy to production and revoke the old one without downtime.
Delete credentials you no longer use
When a credential is no longer needed, delete it from the Developers list. Deletion permanently revokes the clientId / clientSecret pair: any OAuth2 call using that credential will start failing.
Before deleting
Confirm that no production service is still using the credential. If it's the one currently active, deploy the new one first and verify requests are arriving signed with it before deleting the old one.
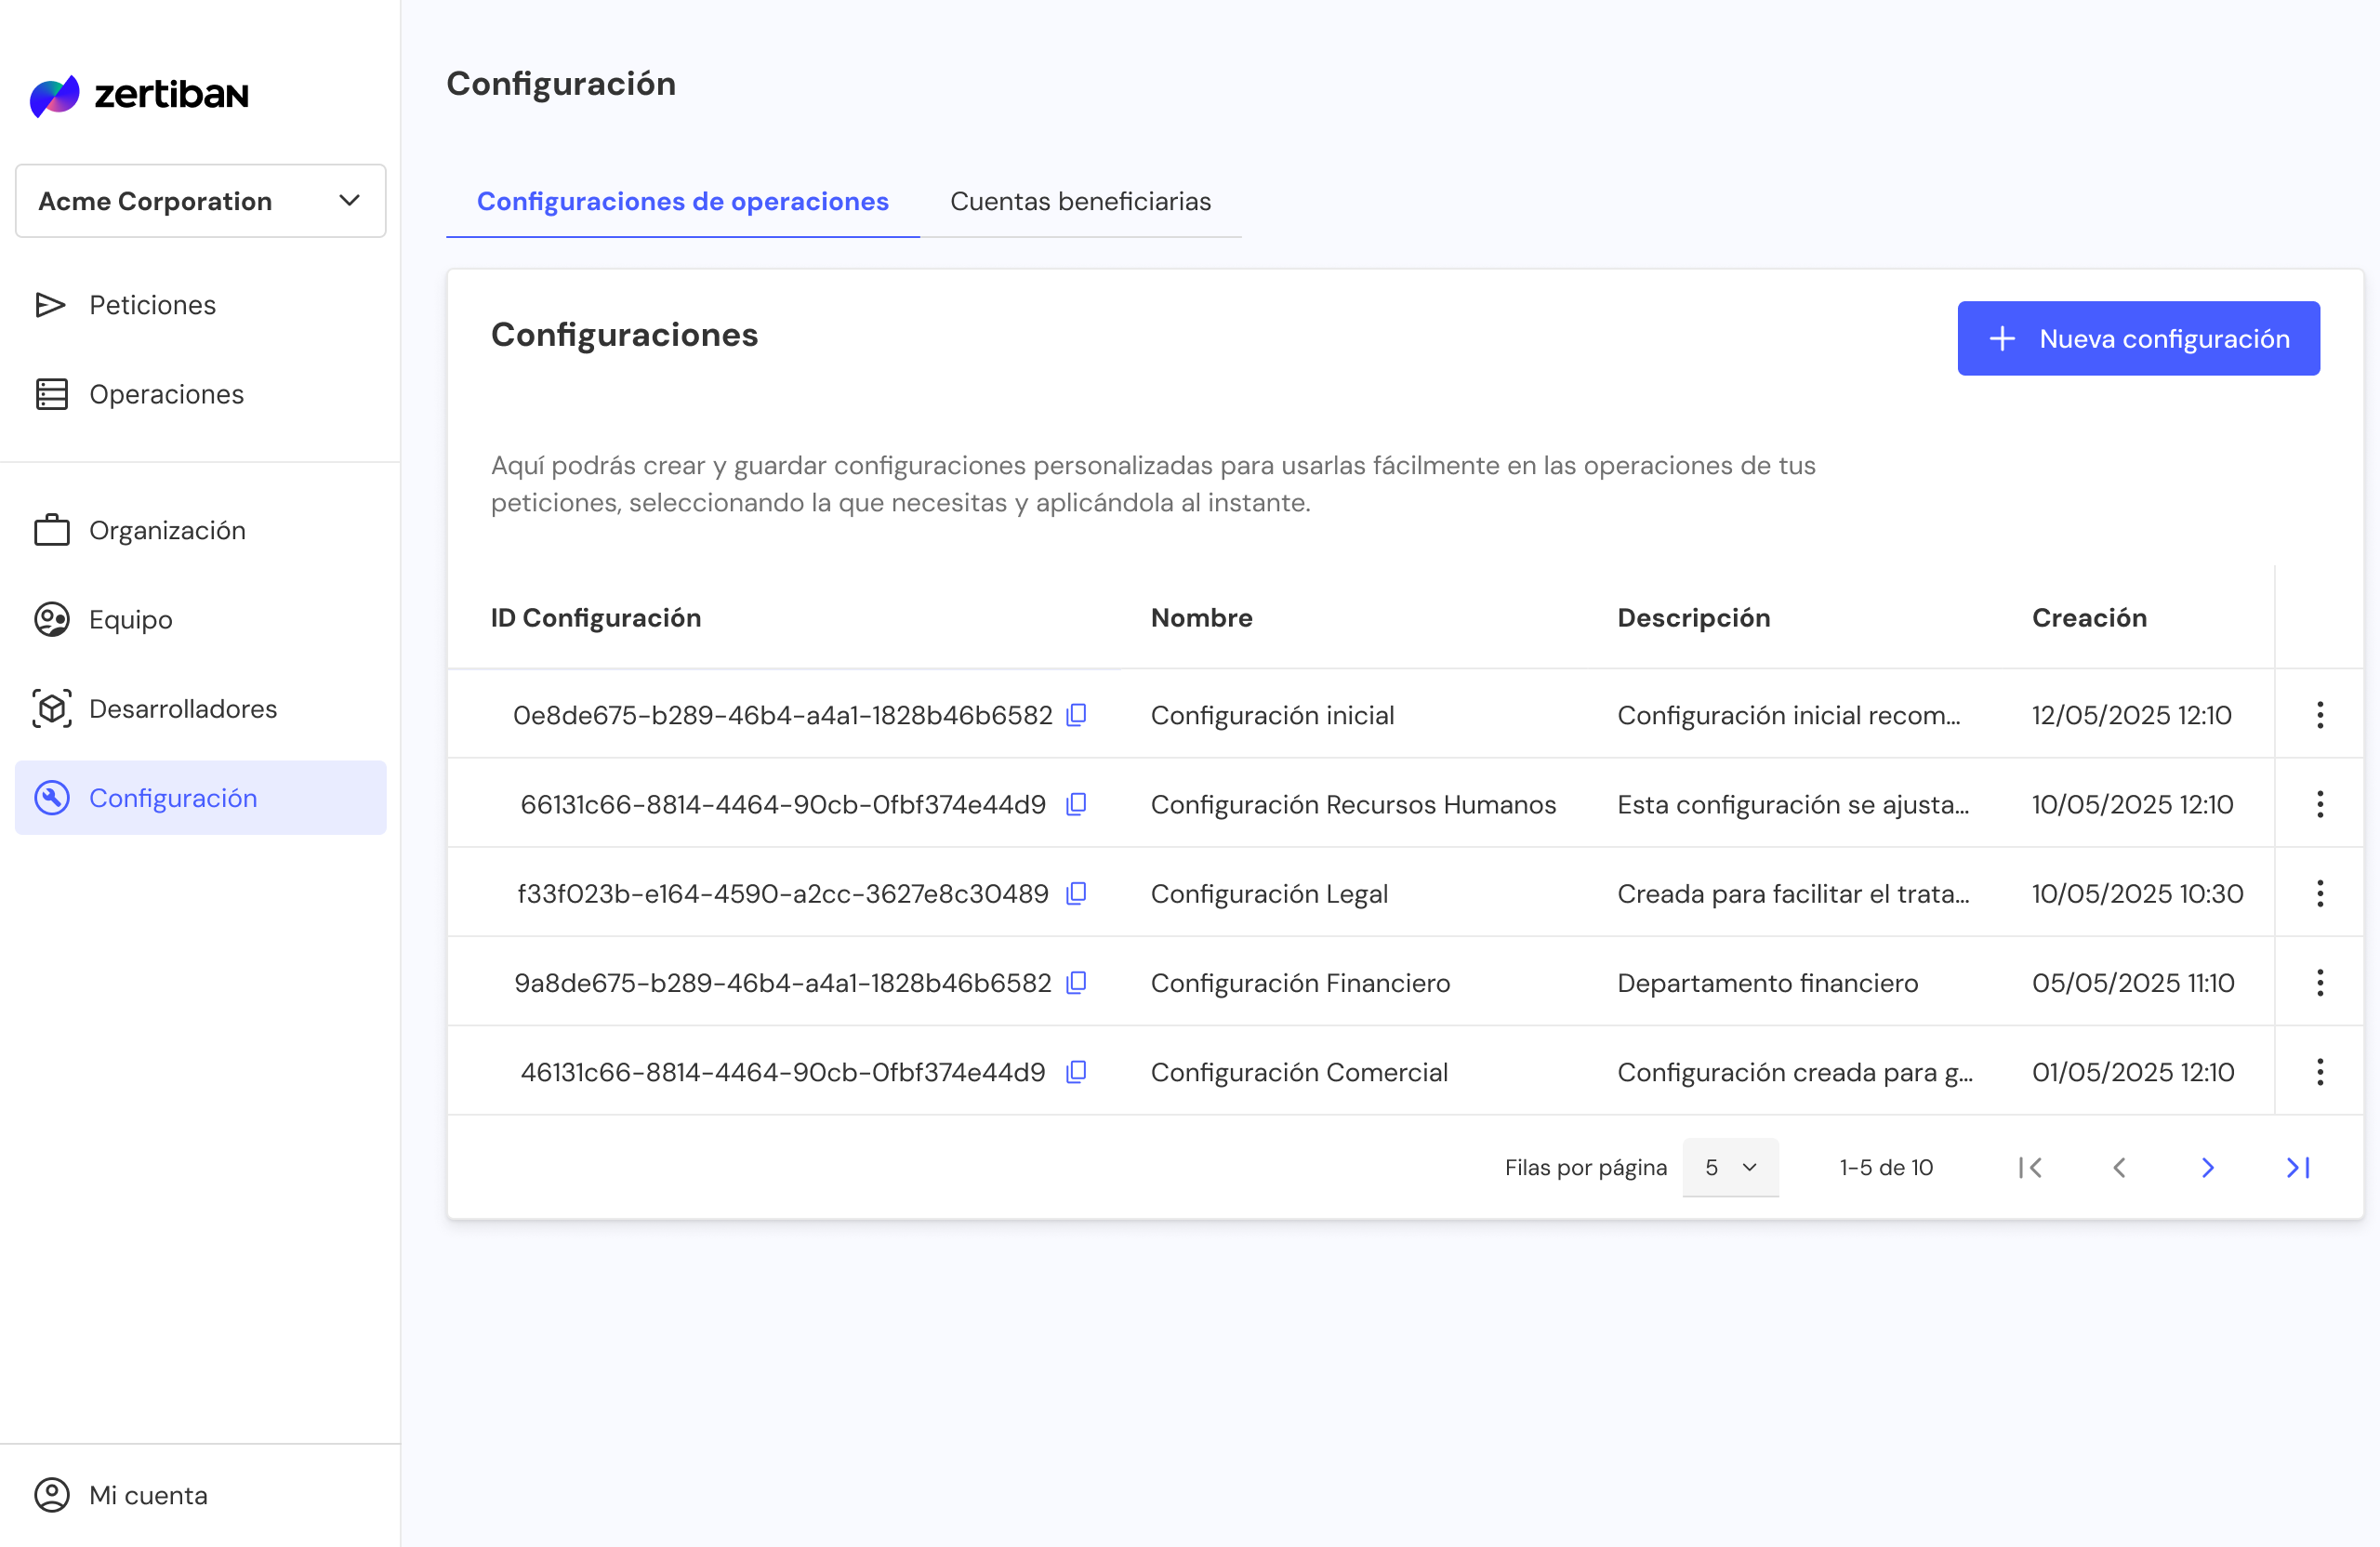
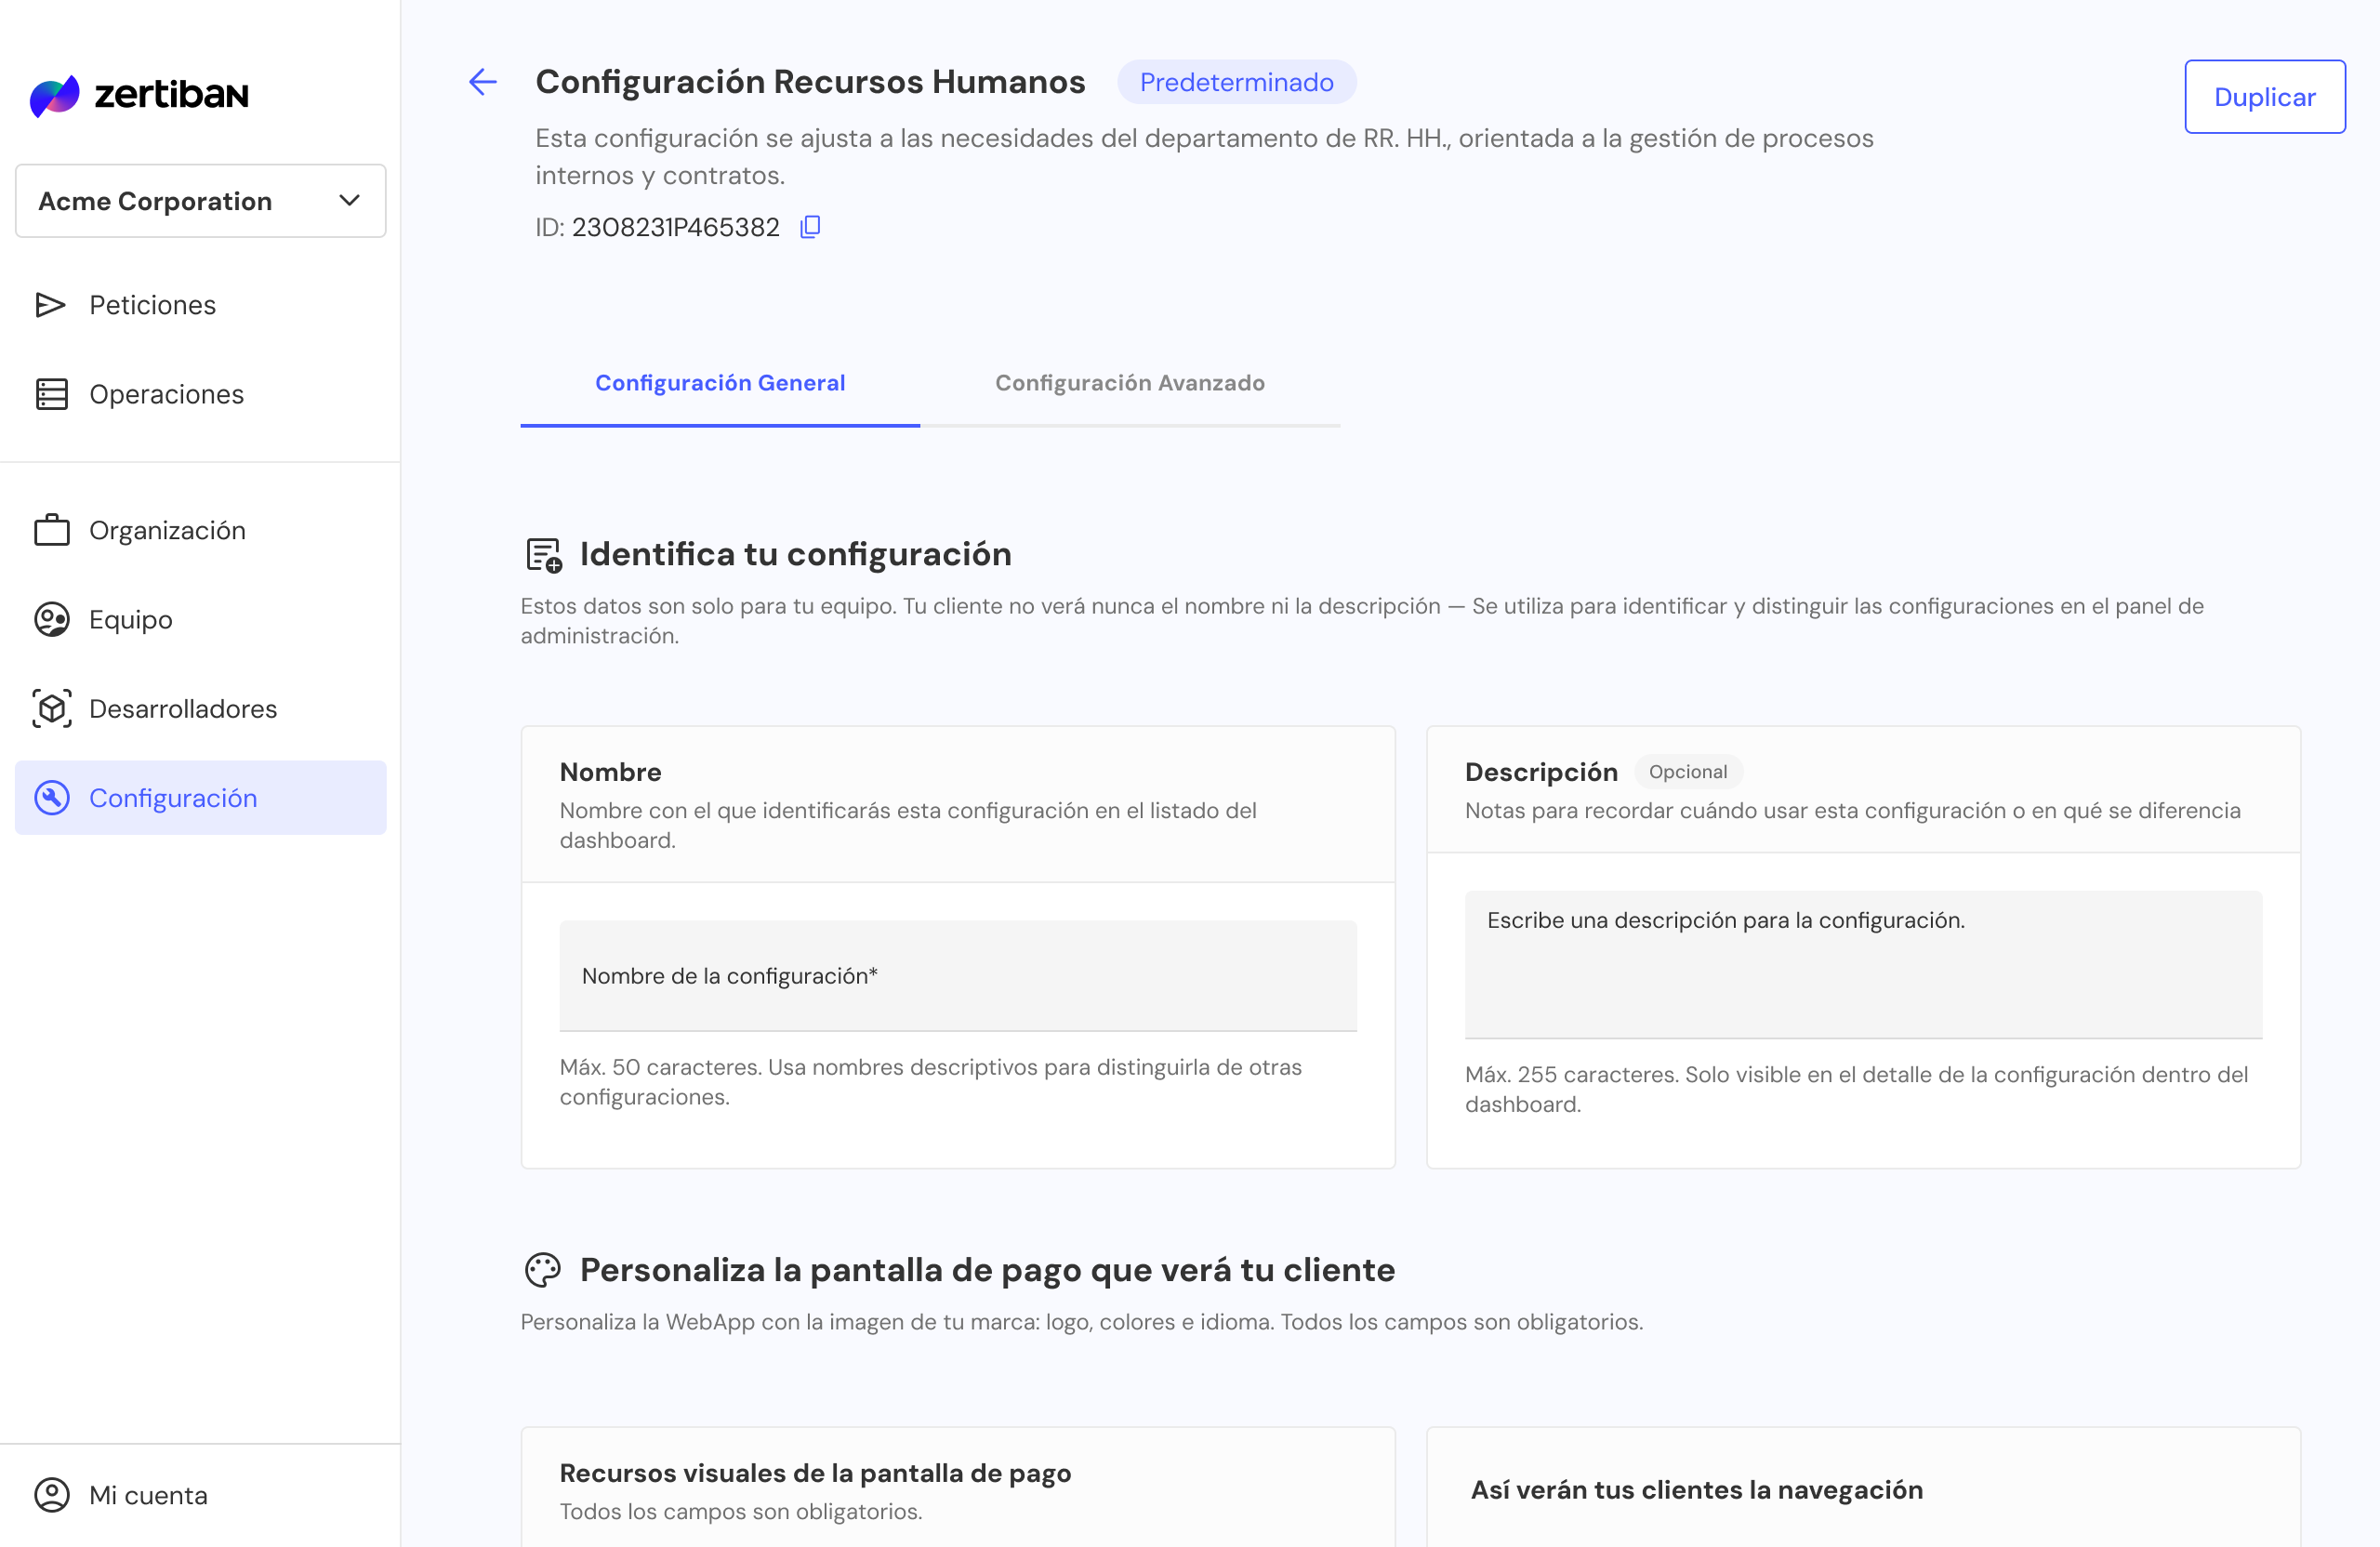
Create a flow configuration
A configuration groups visual appearance, operation behaviour and redirect URLs. You can have several (e.g. "Collections 30 days", "Urgent 7 days") and choose which one to use in each API call.
Go to Configuration → Operation configurations
You'll see the list of existing configurations with their ID, name, description and creation date.
Click New configuration (top right).
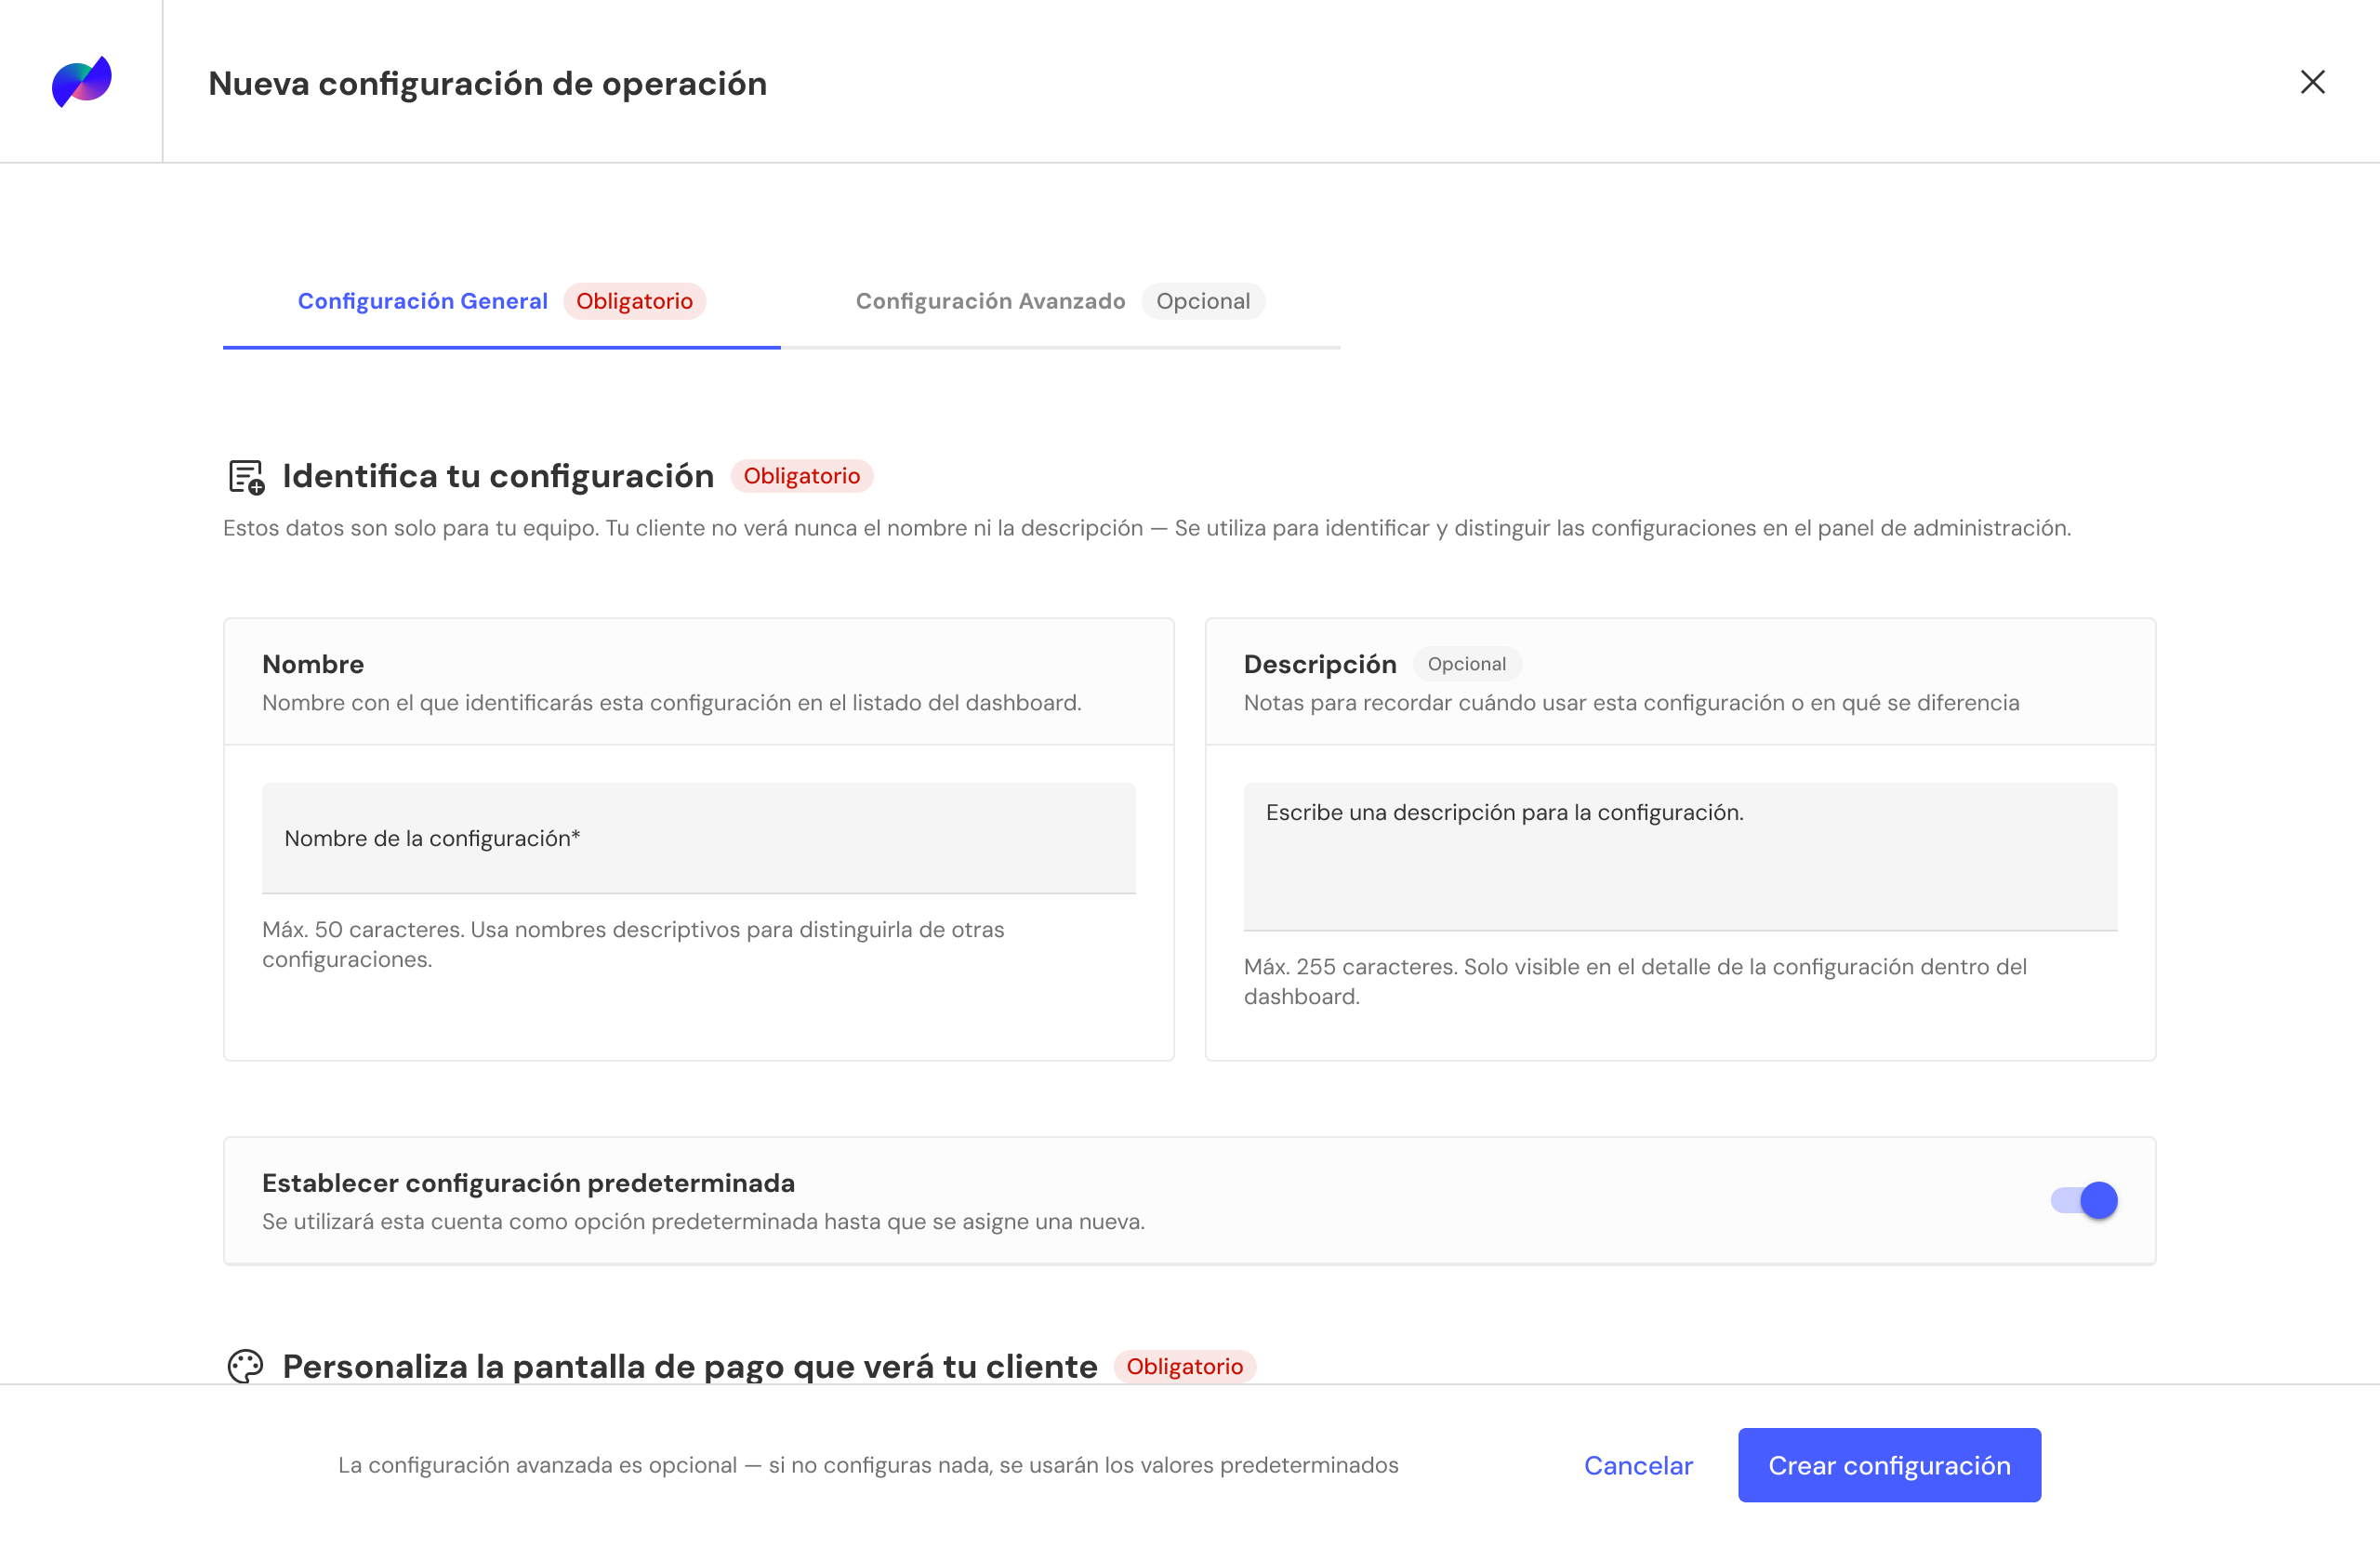
Fill in the form sections
The General Configuration tab (required) groups four sections:
- Identify your configuration: internal name (max. 50) and optional description (max. 255). Your customer doesn't see these.
- Set as default configuration: toggle to mark it as the one used by default.
- Customise the payment screen: logo, colours and language (all required).
- WebApp texts and options: how the navigation behaves for the payer.
The Advanced Configuration tab is optional (operation behaviour, redirect URLs with dynamic parameters such as {operationId} or {operationStatus}). If left blank, default values are used.
Save and copy the configurationUuid
Clicking Create configuration takes you to the detail view. The ID shown under the name is the configurationUuid you'll reference in every API call: use the copy button to add it to your clipboard.
From this same view you can Duplicate the configuration to create a variant without starting from scratch.
Manage transactional operations
The Operations tab shows the complete list of collections and payments generated from the API or from the Dashboard itself. This is where you monitor statuses, investigate incidents and reconcile with your ERP.
Open Operations and apply filters
Combine filters to find a specific operation or a particular range:
- Status CREATED OPENED COMPLETED REJECTED EXPIRED CANCELLED
- Date range: creation date or expiration date
- externalId: internal identifier sent by your ERP
- Amount: minimum / maximum range
- Configuration: filter by
configurationUuid

Open an operation's detail
Click a row to see:
- Header:
operationUuid,externalId, status, amount and concept - Payer: name, email, detected IBAN and selected bank
- Beneficiary account:
creditorAccountUuidand alias of the destination IBAN - History: timeline with each status change and its timestamp
- Documents: PDF with QR, receipt and attachments
- Webhooks: sent notifications, HTTP response and retries
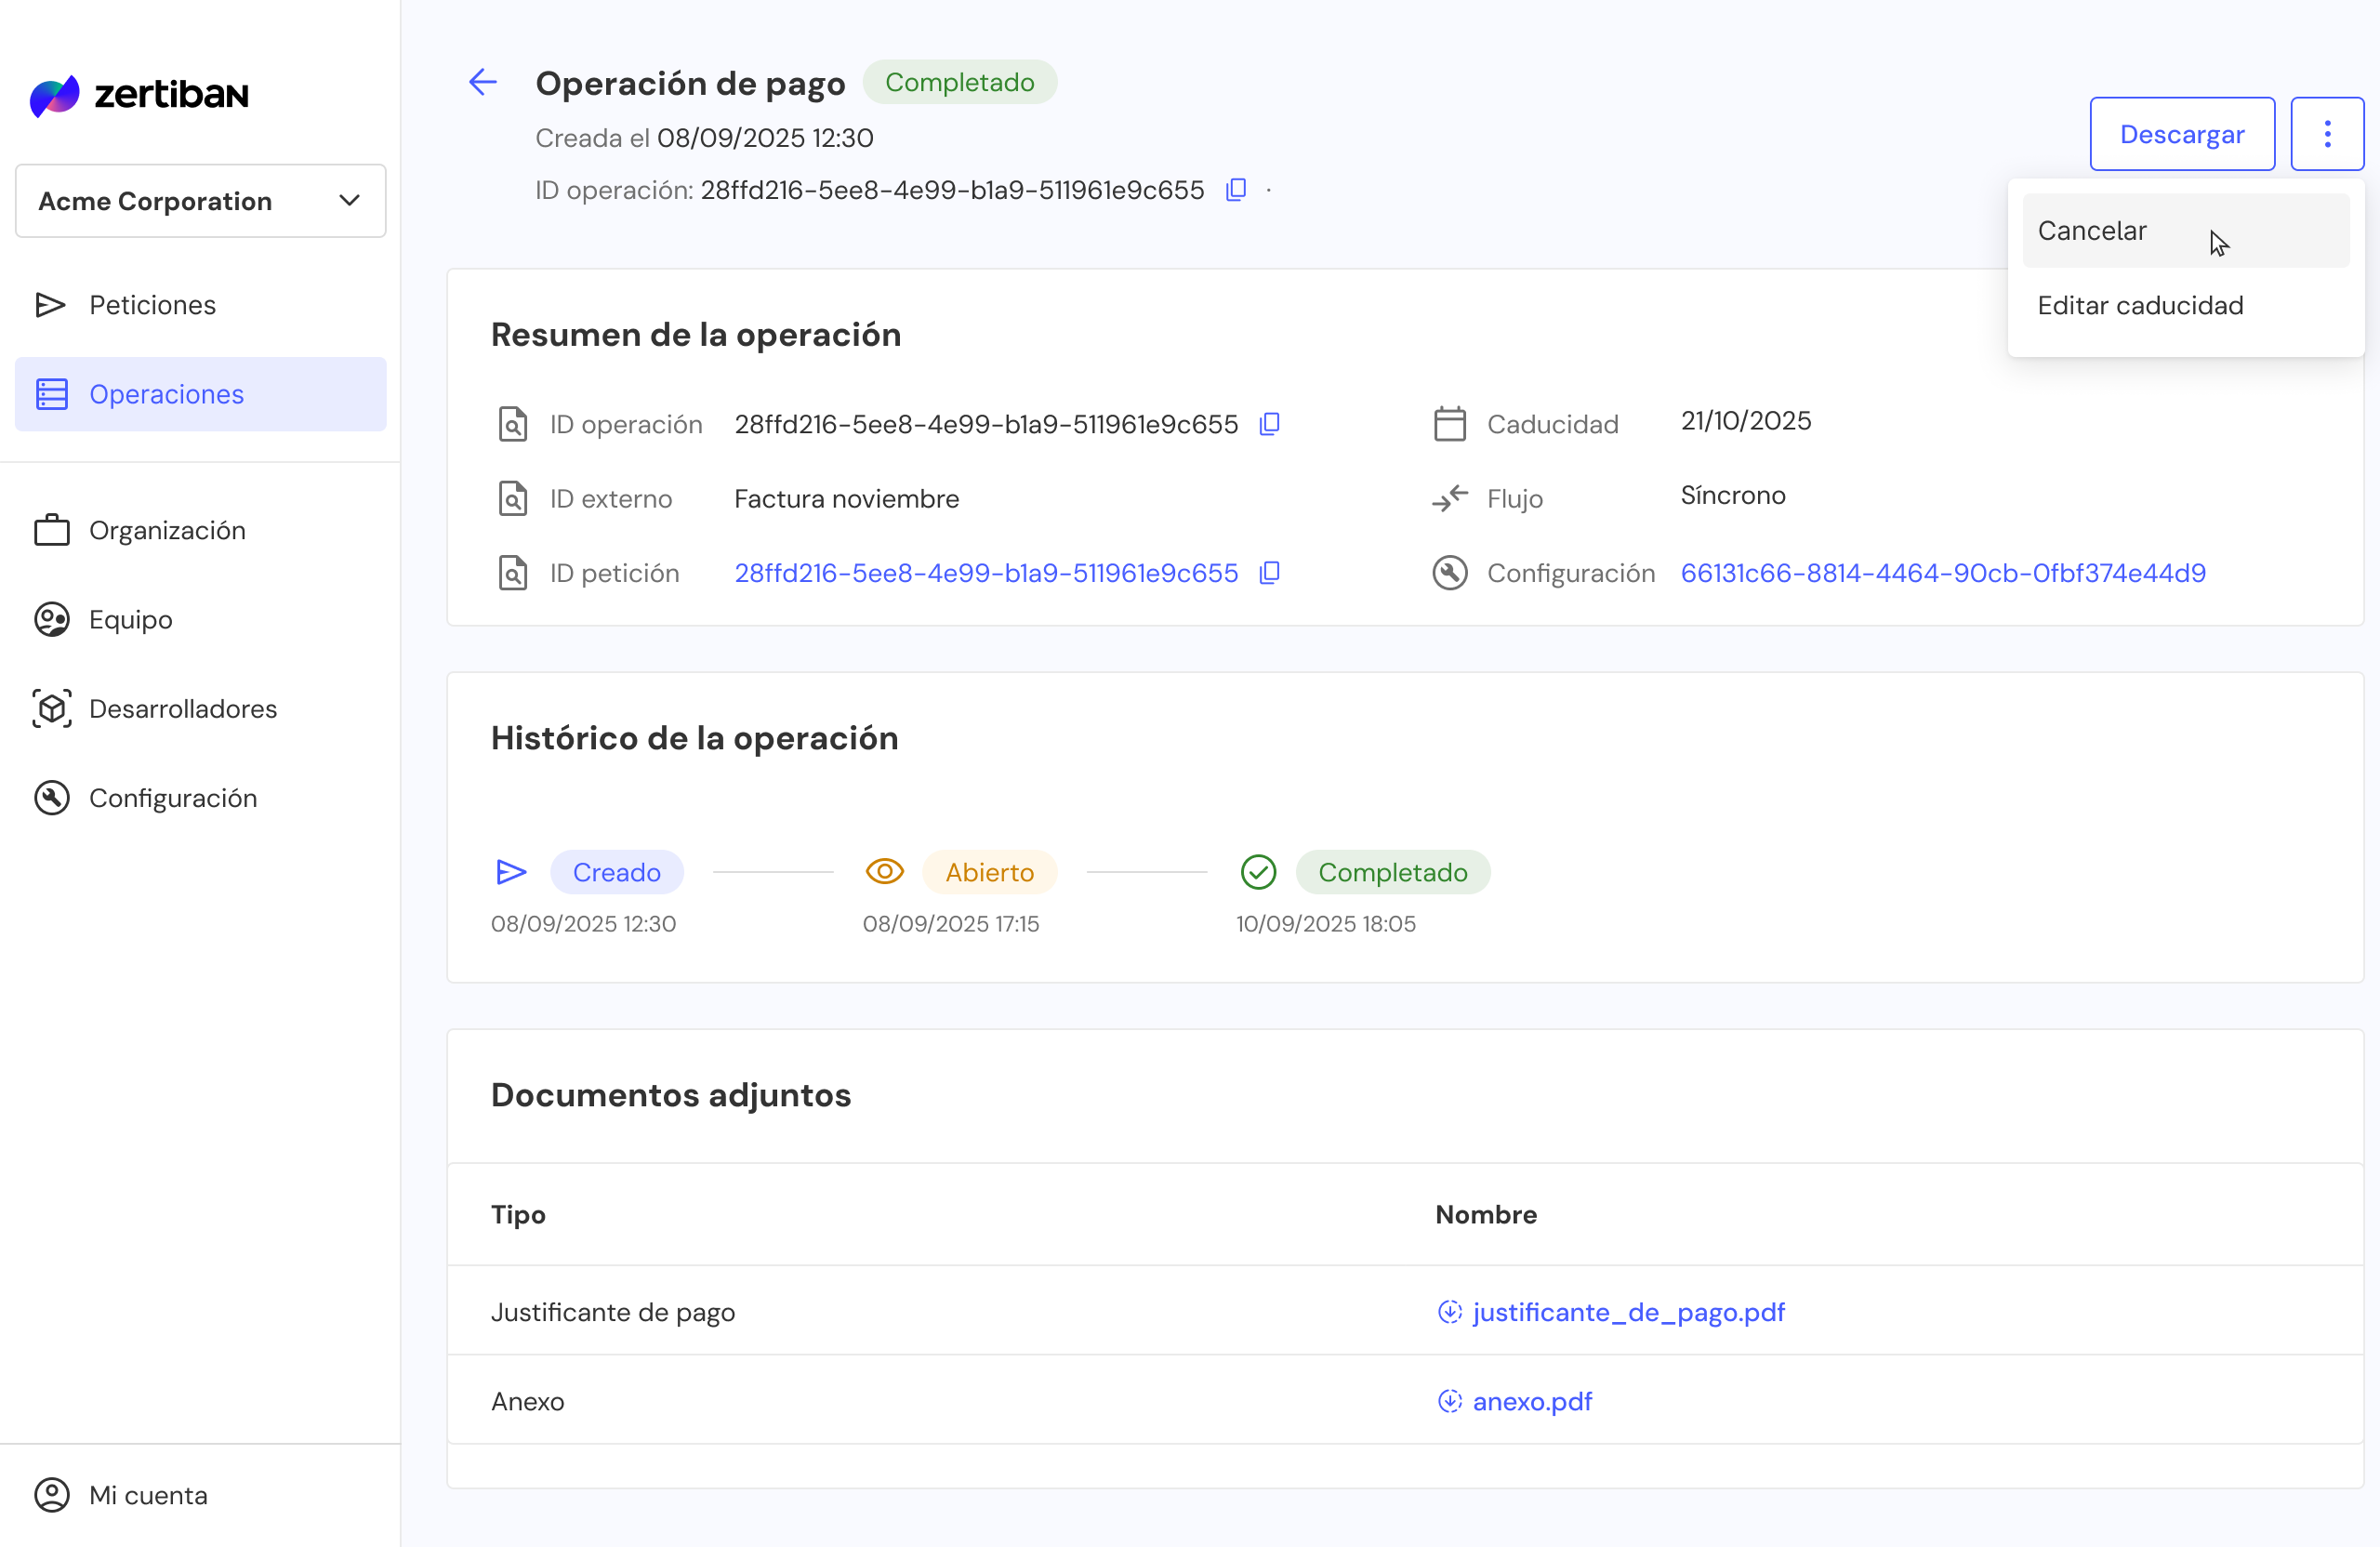
Available actions
| Action | When to use it |
|---|---|
| Download | Download the documents associated with the operation. |
| Cancel | Available for operations in CREATED or OPENED state with no payment in progress. |
| Edit expiration | Available for operations in CREATED or OPENED state. |
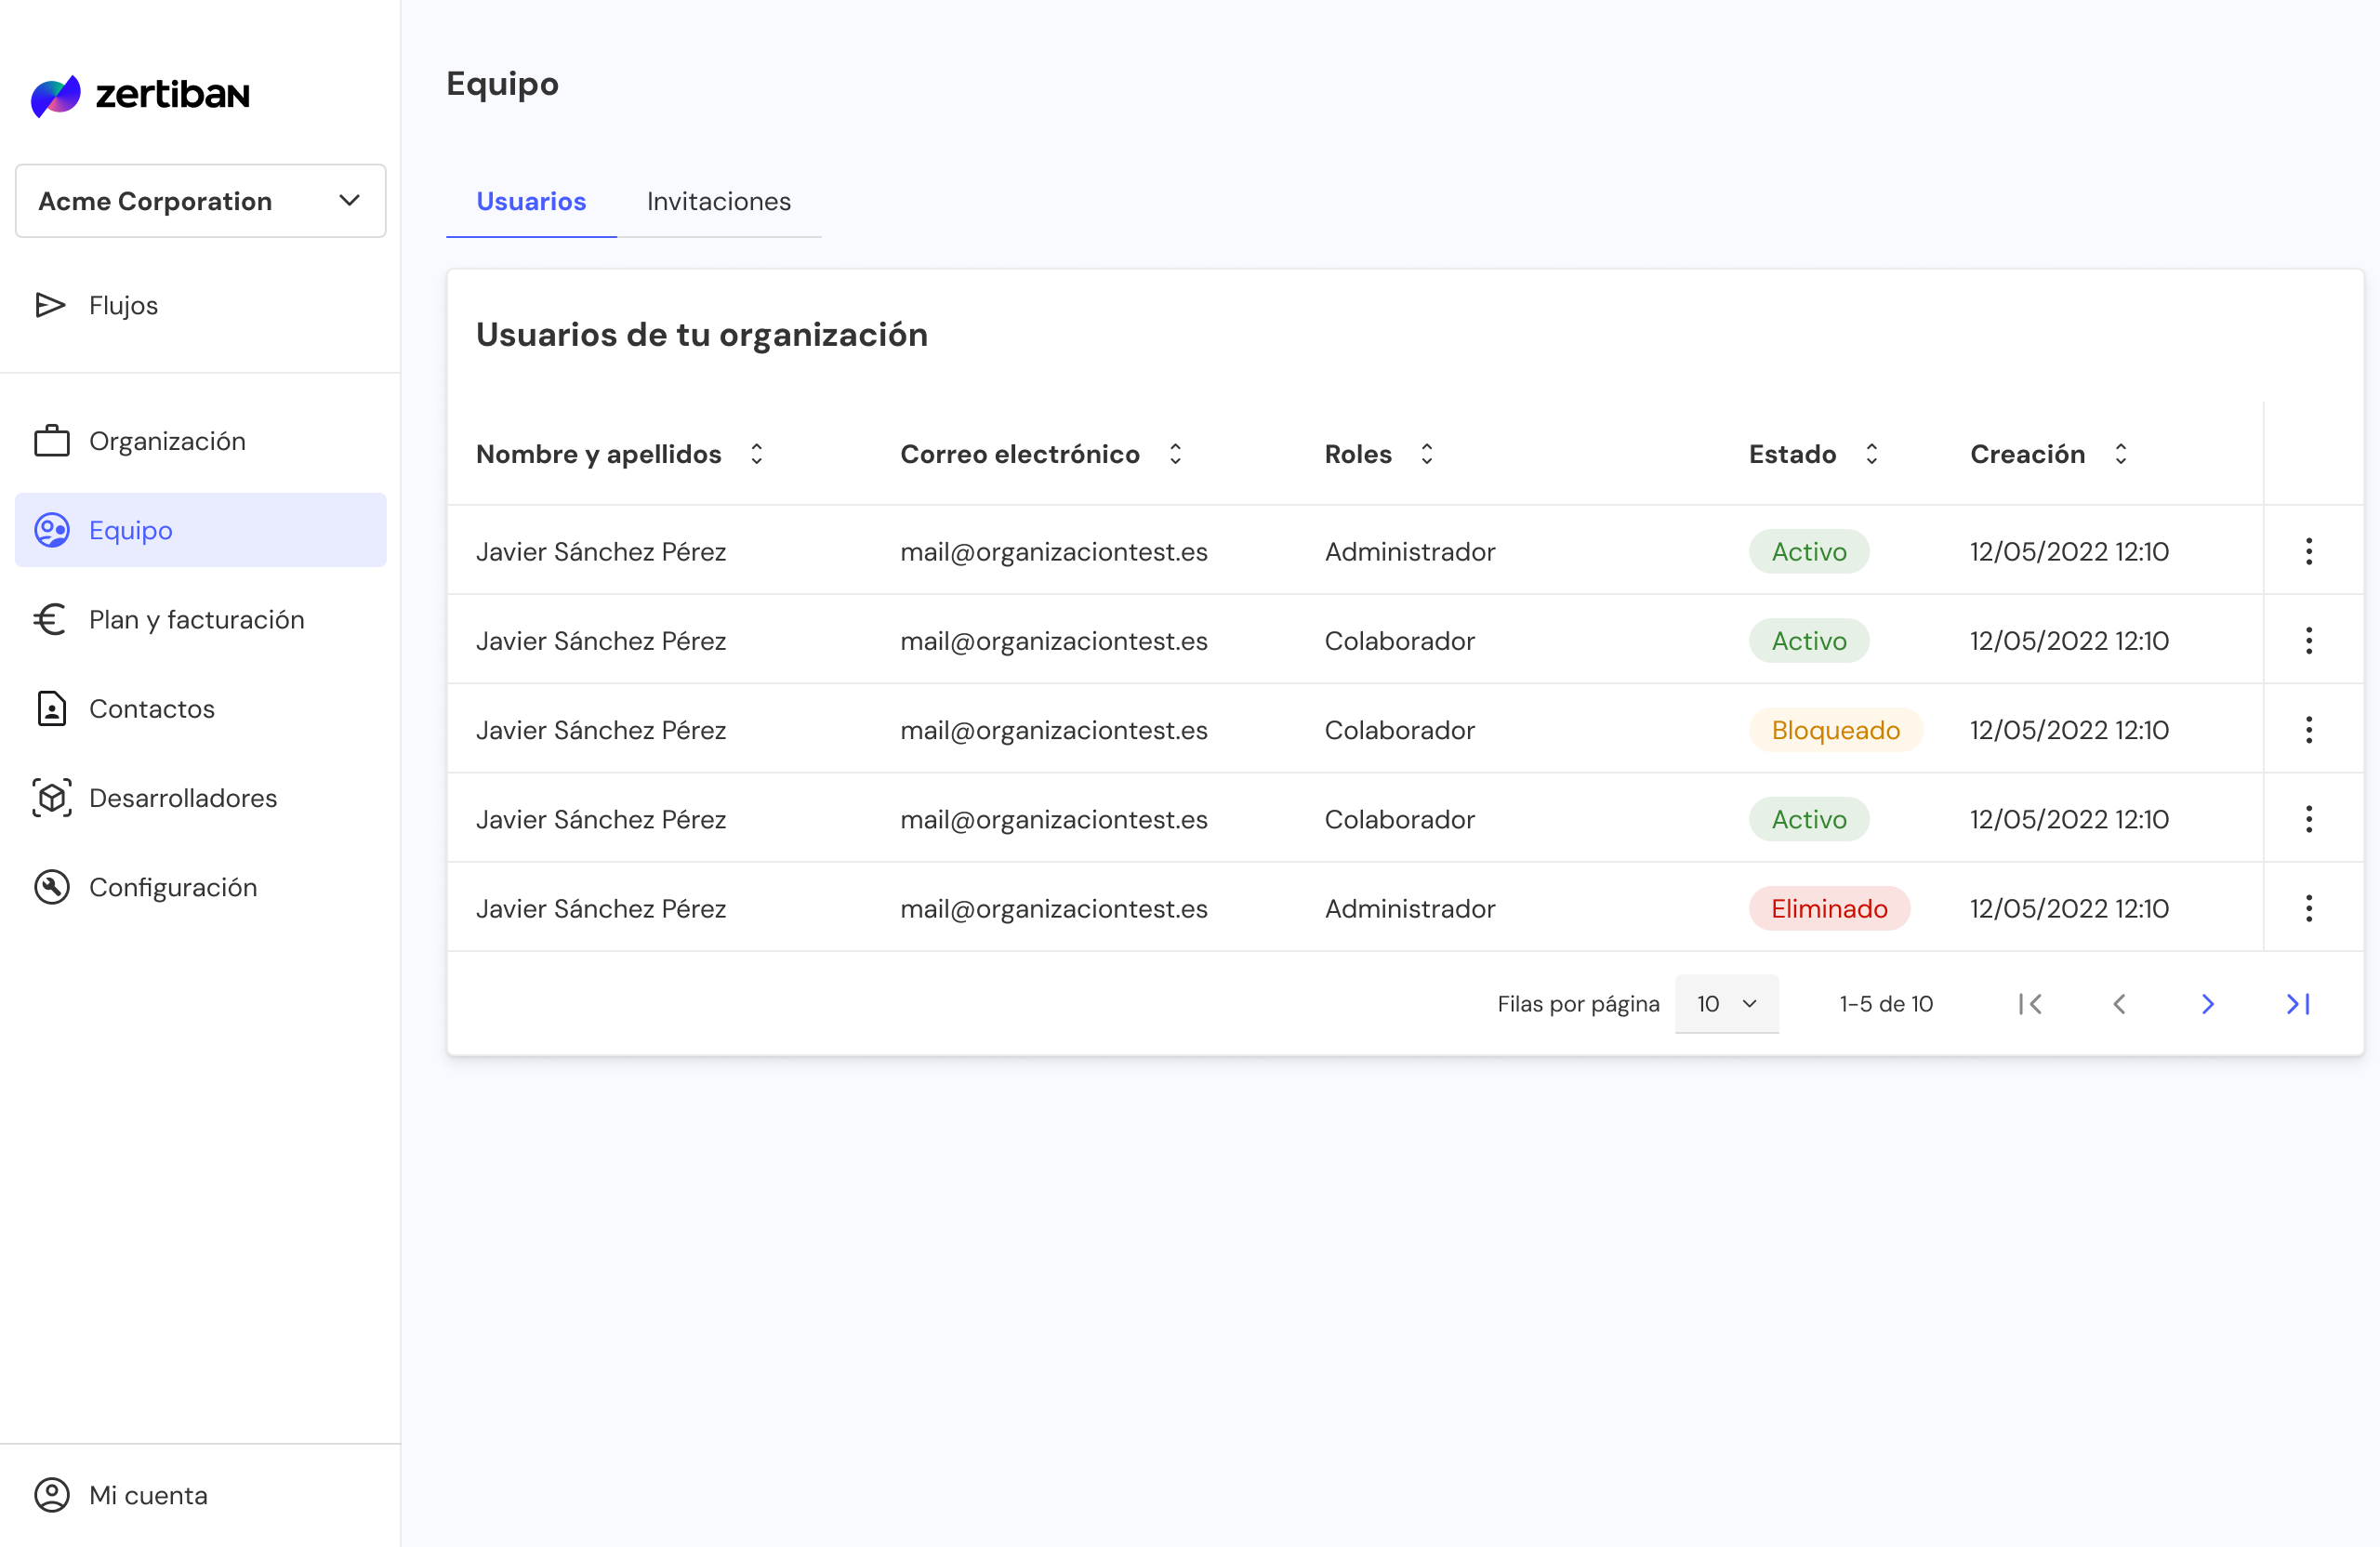
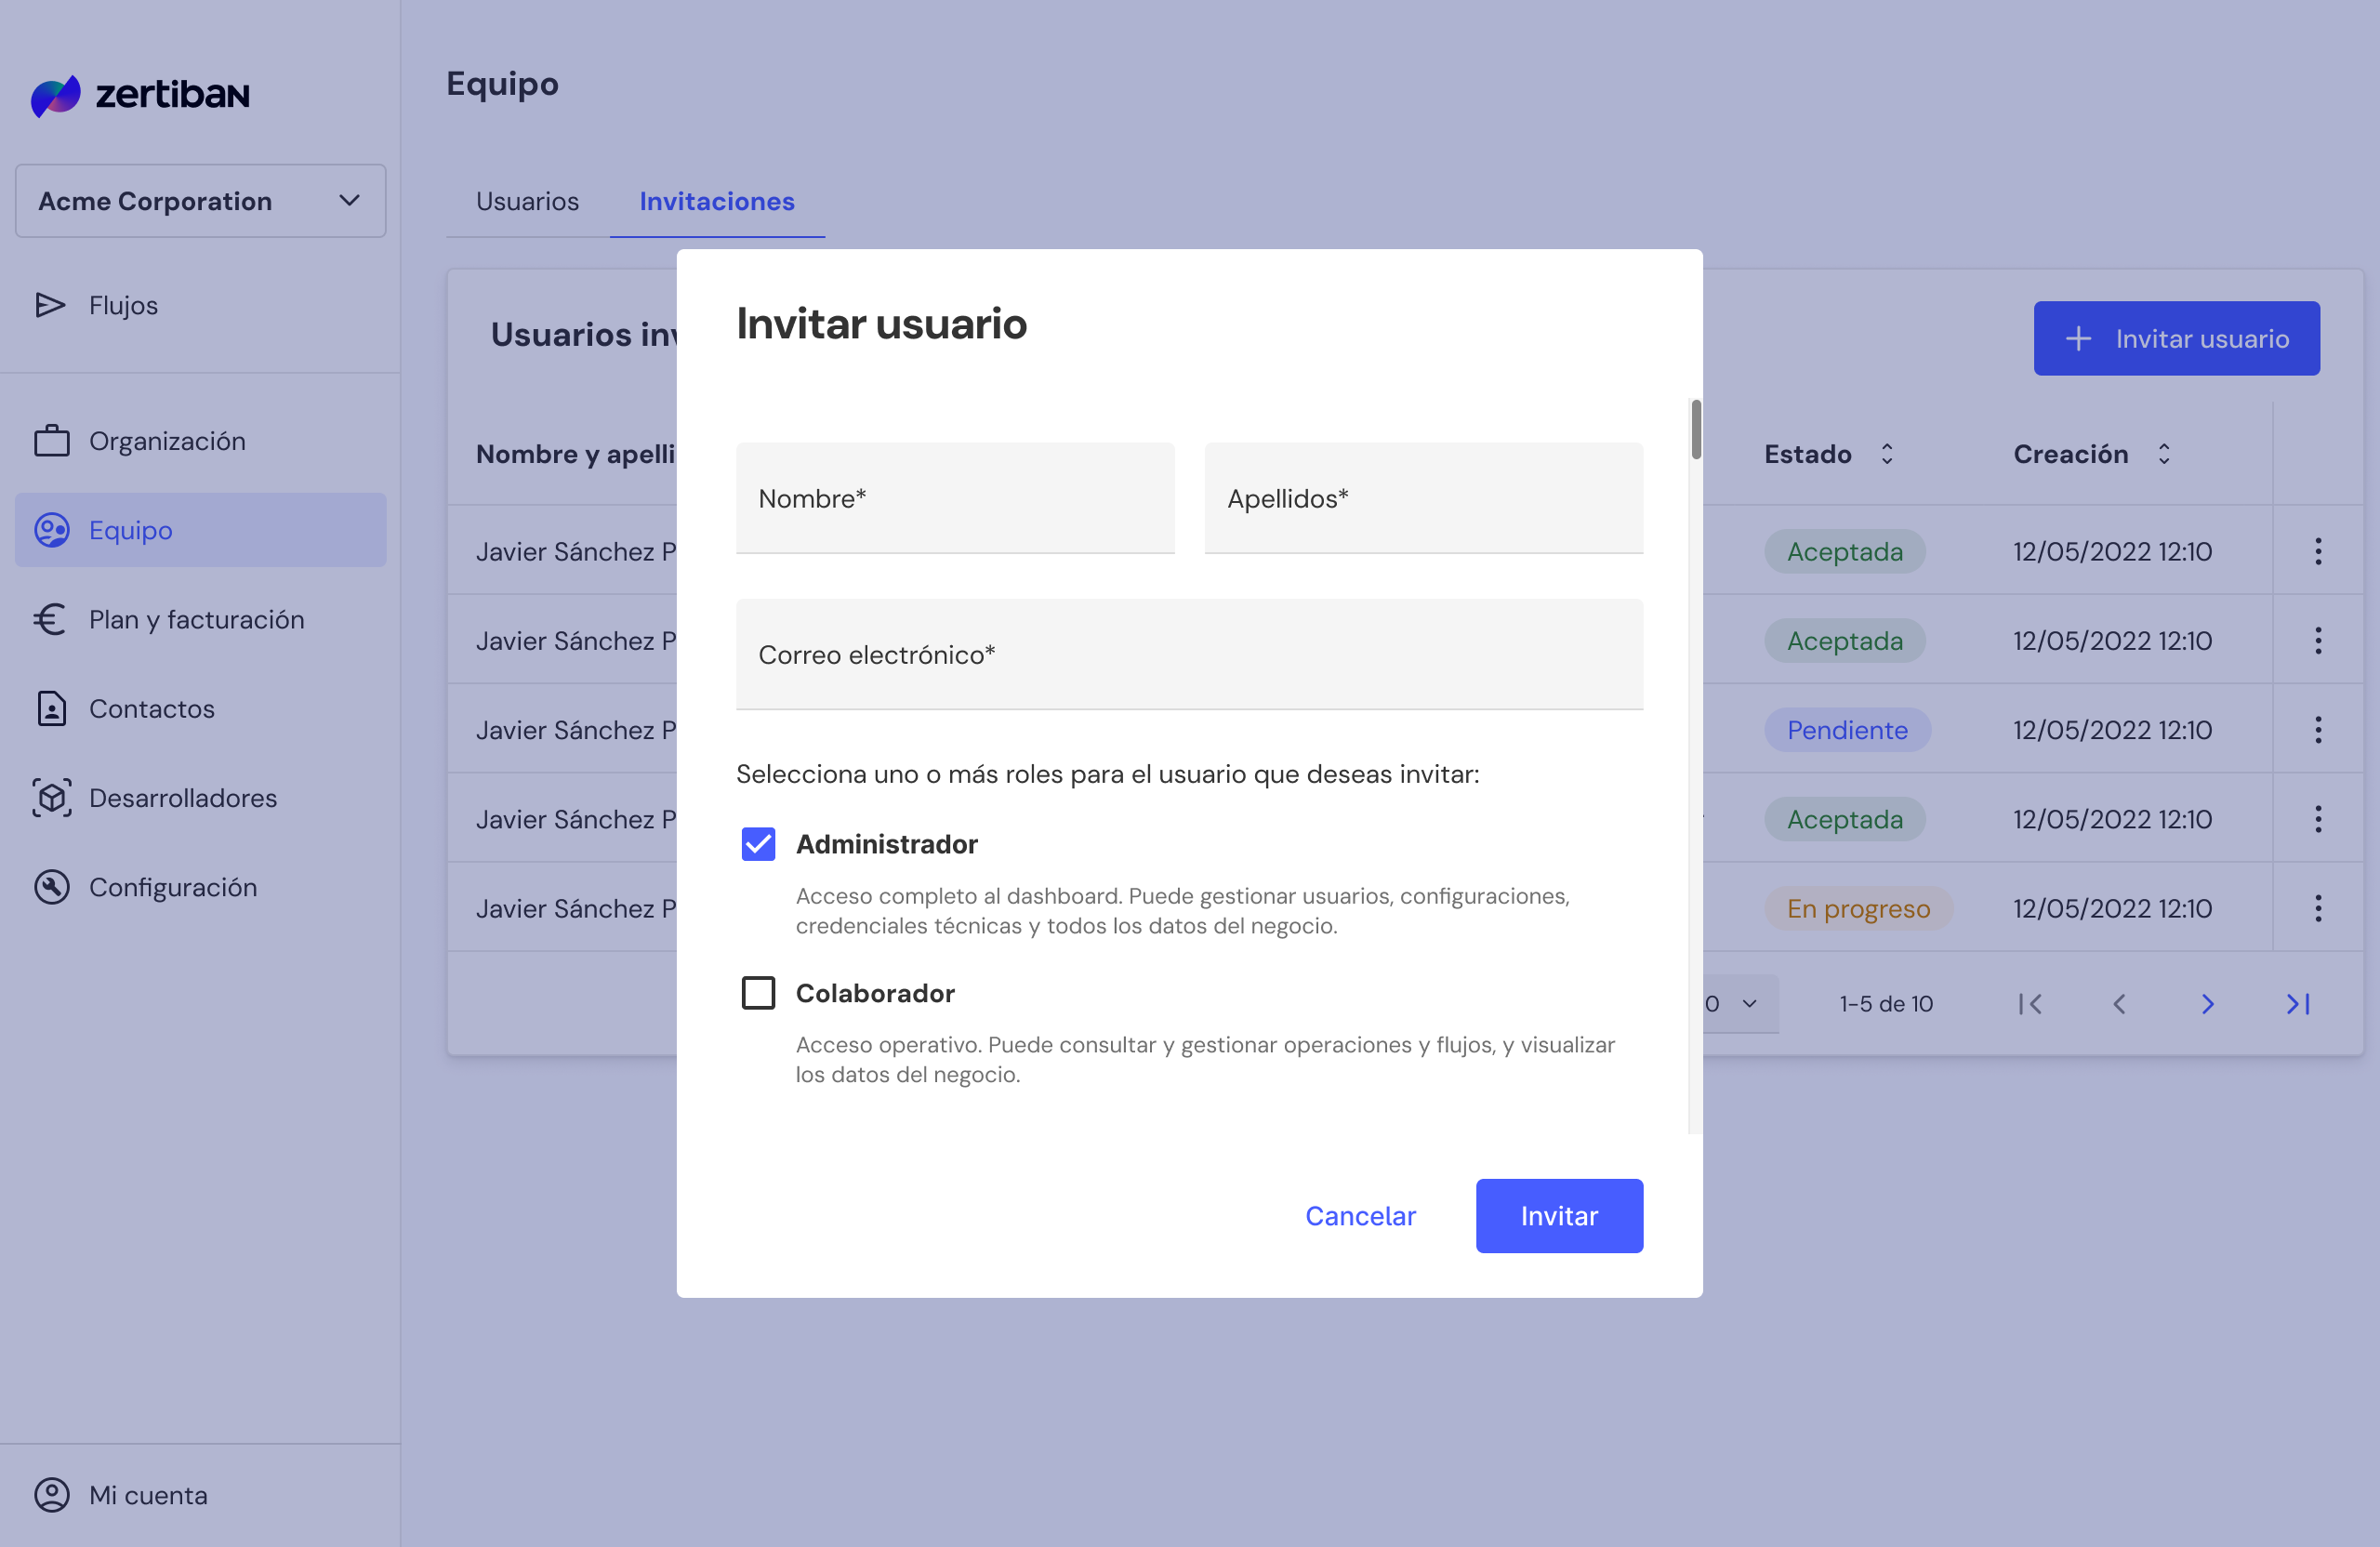
Manage users and invitations
The Users tab controls who has access to your businessUuid and at what permission level.
Review available roles
Zertiban handles only two roles:
- Administrator Full dashboard access. Can manage users, configurations, technical credentials and all business data.
- Collaborator Operational access. Can view and manage operations and flows, and view business data.
Invite a user
Click Invite user and fill in:
- Email of the invited user
- Initial role (Administrator or Collaborator)
The invitee receives a unique link that expires in 7 days. If not accepted, resend it from the list.
Manage user access and invitations
- Change role: switch between Administrator and Collaborator at any time.
- Block: temporarily revoke access without losing history.
- Remove: permanently revoke access. Technical credentials created by that user remain active: rotate them manually if needed.
- Resend invitation: for expired pending invitations.
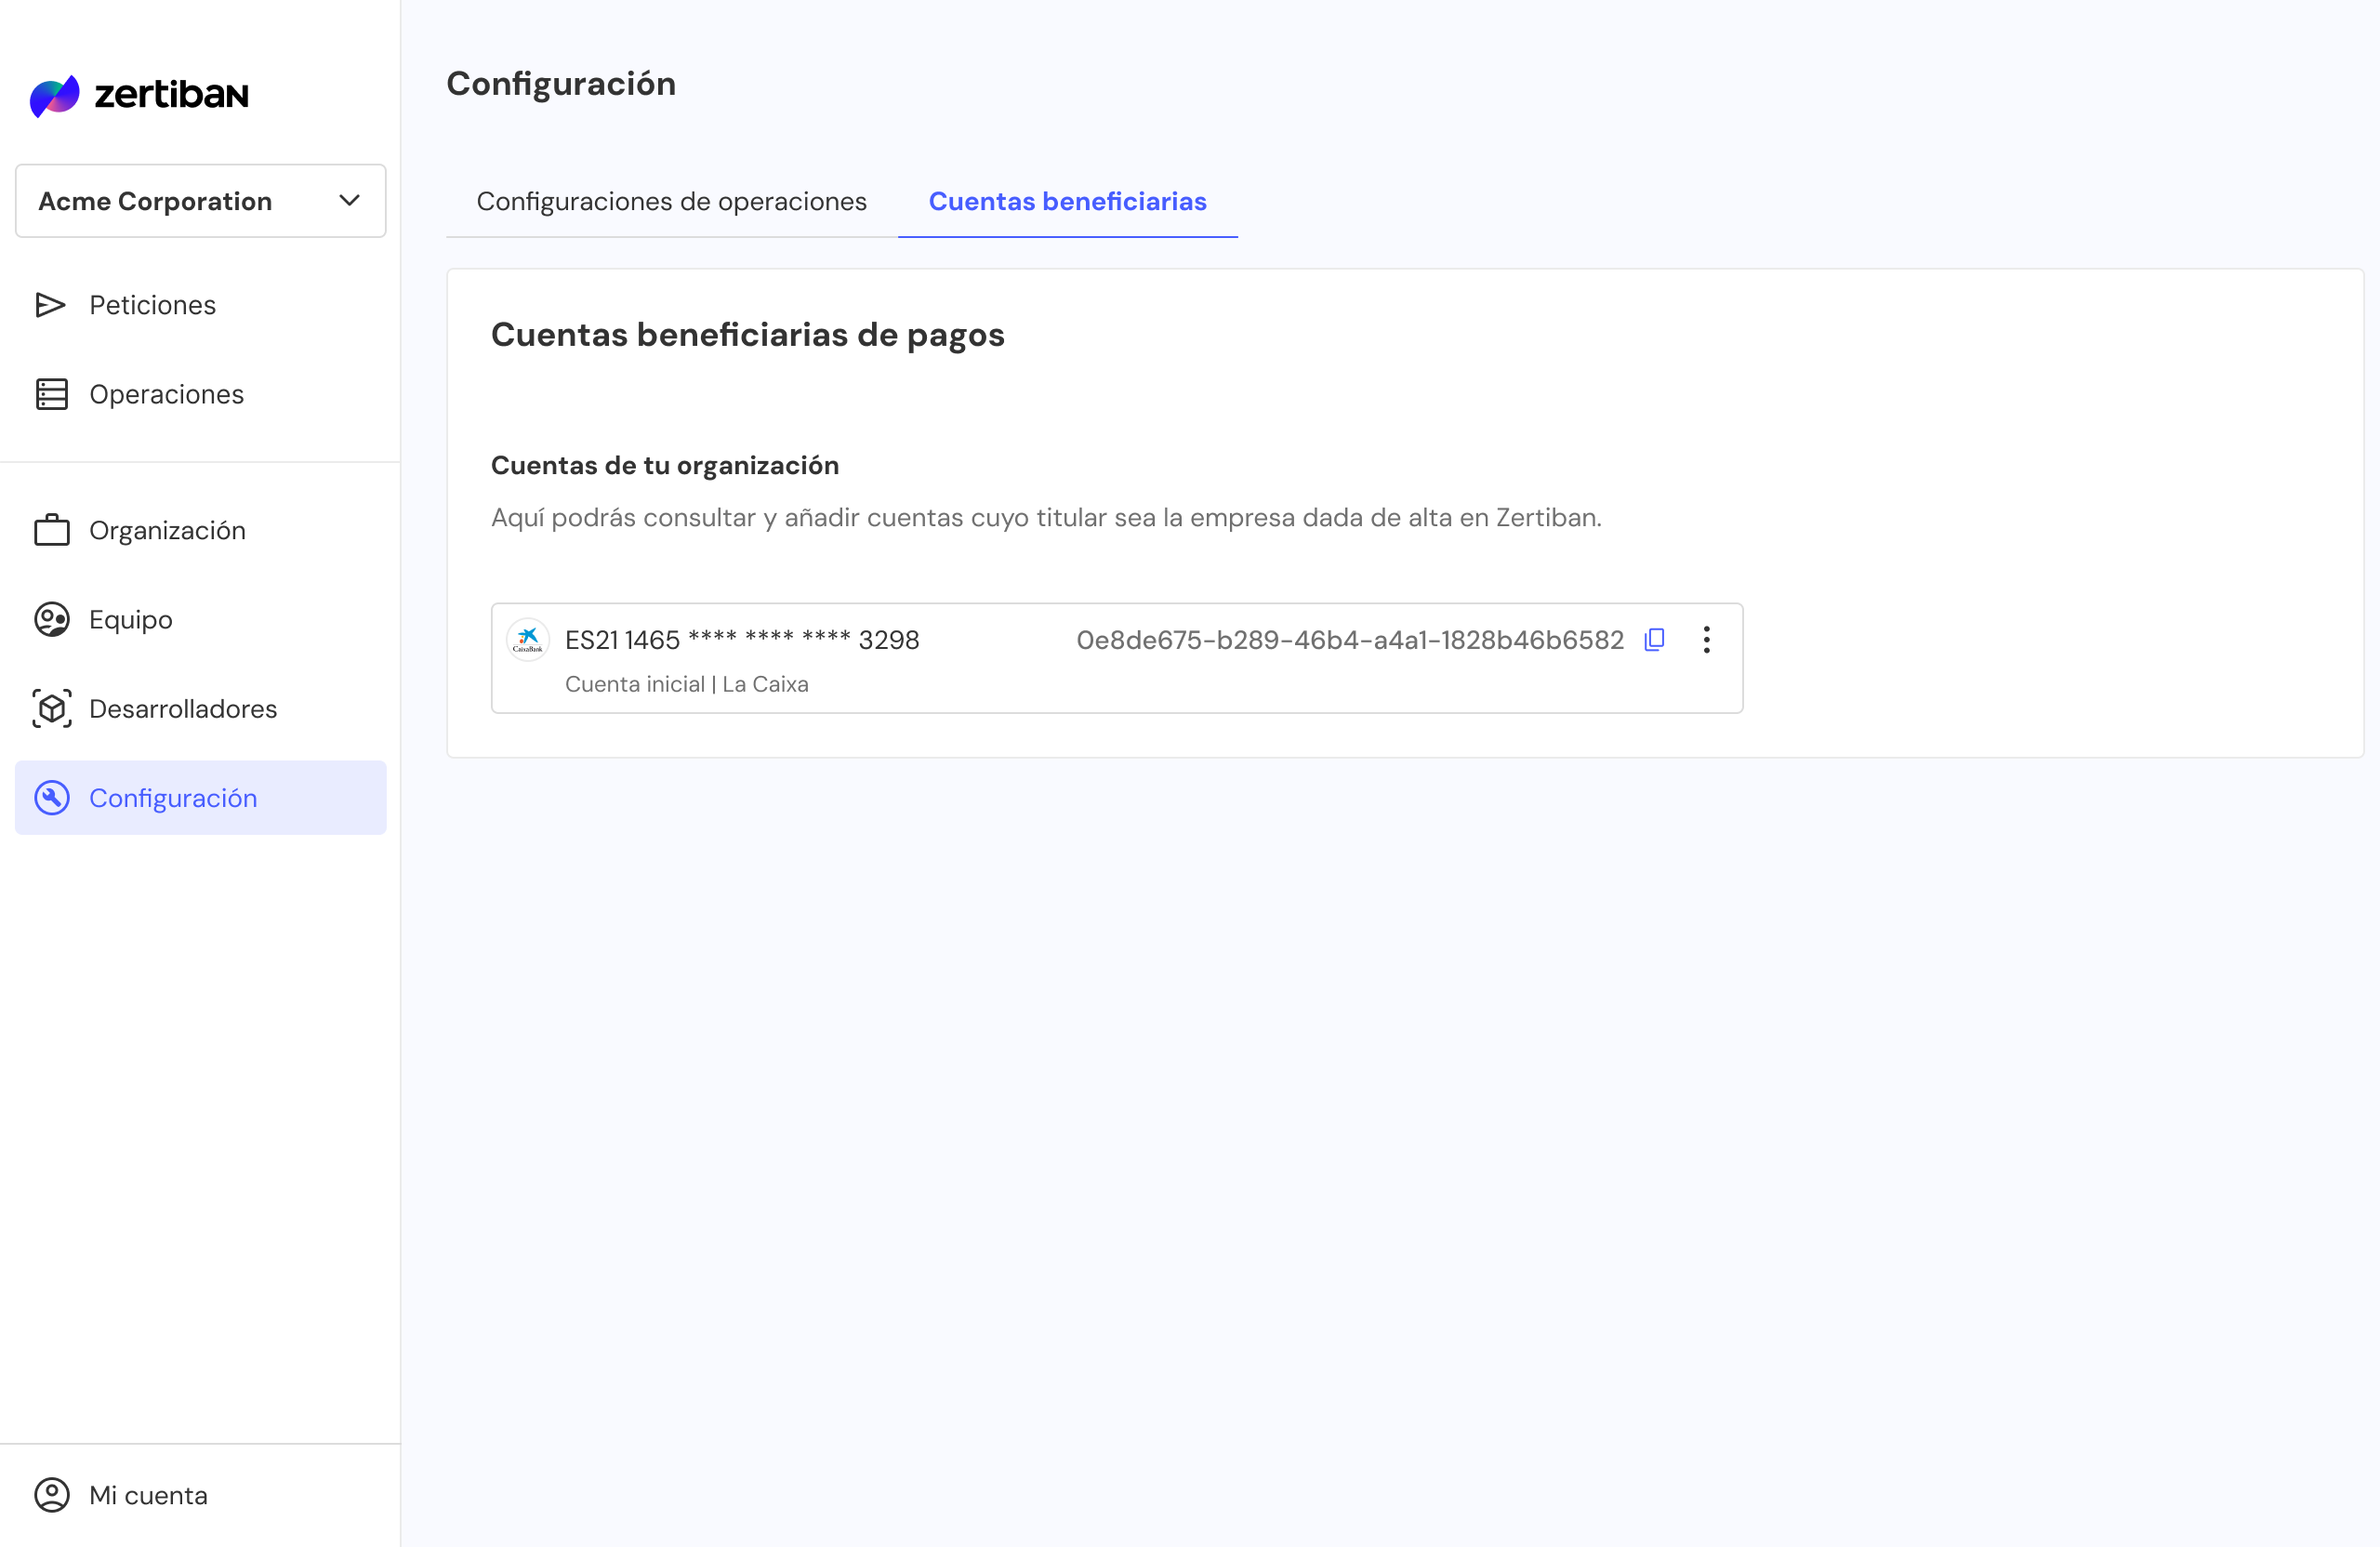
Beneficiary accounts
Each beneficiary account registered in Zertiban has a unique creditorAccountUuid. This identifier links each operation to the specific bank account where funds processed through the platform will be received.
Go to Configuration → Beneficiary accounts
You'll see the full list of accounts associated with your businessUuid, along with the creditorAccountUuid needed to reference them from the API.
The first account is registered during onboarding: in sandbox by email to [email protected] and in production in Step 2 (€0.01 verification payment).
Enable, disable and edit accounts
From the Dashboard you manage each account's status and metadata according to your organisation's operational needs:
- Enable / disable: control which accounts can receive new operations. Disabled accounts cannot be used in new operations or API requests.
- Default account: change which one is used by default when an API request does not explicitly include a
creditorAccountUuid. - Alias: edit the descriptive name associated with each account to make it easier to identify and manage internally.
Restrictions when disabling
Zertiban does not allow disabling all existing accounts or the account marked as default. Switch the default first if you need to disable the current one.
Checkpoint: you have the 6 values
Save the 6 values as environment variables. With these values you can already use PagaFactu and ZertiPay, both use the same credentials.
ZERTIBAN_BUSINESS_UUID=xxxxxxxx-xxxx-xxxx-xxxx-xxxxxxxxxxxx
ZERTIBAN_CONFIG_UUID=xxxxxxxx-xxxx-xxxx-xxxx-xxxxxxxxxxxx
ZERTIBAN_CLIENT_ID=xxxxxxxx-xxxx-xxxx-xxxx-xxxxxxxxxxxx
ZERTIBAN_CLIENT_SECRET=xxxxxxxxxxxxxxxxxxxxxxxxxxxxxxxx
ZERTIBAN_CREDITOR_UUID=xxxxxxxx-xxxx-xxxx-xxxx-xxxxxxxxxxxx
ZERTIBAN_WEBHOOK_SECRET=xxxxxxxxxxxxxxxxxxxxxxxxxxxxxxxx
Need help?
Contact [email protected] and the Zertiban team will guide you through the process.